Applying for a passport or visa can be a stressful process, and a rejected photo can add significantly to the frustration. What seems like a simple part of the application, the passport photo, can often be the cause of unexpected and costly delays. According to the U.S. Department of State, a noteworthy percentage of passport applications face rejection due to photo-related issues each year. This comprehensive guide aims to empower you by providing a clear, step-by-step approach to understanding and resolving common passport photo rejection issues, so you can get your application approved without unnecessary headaches.
Decoding the Rejection Notice: Understanding Why Your Photo Was Rejected
Receiving a rejection notice for your passport photo can be disheartening. However, understanding the specific reasons behind the rejection is the critical first step toward resolving the issue. Here's a breakdown of the most common reasons for passport photo rejection, categorized for easy understanding and quick troubleshooting:
Size and Dimensions
- Incorrect Size: U.S. passport photos must be precisely 2x2 inches (51x51 mm). Photos submitted that are not exactly this size, whether too large or too small, will be rejected outright.
- Improper Head Size: The head size is also strictly regulated. The head must measure between 1 inch and 1 3/8 inches (25 mm and 35 mm) from the bottom of the chin to the top of the head. Ensure the head is proportionally correct within the photo.
Background Issues
- Non-Compliant Color: The background must be a plain white or off-white. Dark, colored backgrounds, patterns, or any kind of distracting elements are not acceptable and will result in rejection.
- Uneven Lighting: Shadows or dark areas appearing on the background are a common cause for rejection. The background needs to be evenly lit to ensure a clear and uniform appearance.
Attire and Accessories
- Eyeglasses: As of November 1, 2016, eyeglasses are generally not allowed in U.S. passport photos. The only exception is a documented medical necessity.
- Head Coverings: Hats, scarves, or other head coverings are generally prohibited. Exceptions are made if the head covering is worn daily for religious reasons, in which case a signed statement is required to verify this practice. The head covering must not obscure any part of the face.
- Jewelry: While jewelry is not strictly prohibited, excessive or large, distracting pieces can lead to rejection. It's best to keep jewelry minimal to avoid any potential issues.
Facial Expression and Pose
- Non-Neutral Expression: Applicants must exhibit a neutral facial expression. This means both eyes must be open, and the mouth must be closed. Smiling, frowning, squinting, or any exaggerated expressions are not permitted.
- Incorrect Pose: The applicant must face the camera directly, ensuring the entire face is fully visible. Photos taken at an angle or with the head tilted will be rejected as they do not meet the biometric requirements.
Image Quality
- Poor Resolution: Photos must be clear and sharp, possessing a resolution of at least 300 DPI (dots per inch). Submitting blurry, grainy, or pixelated photos will lead to automatic rejection.
- Over or Underexposure: Photos that are either too dark (underexposed) or too light (overexposed) will not be accepted. The image needs to have proper contrast and brightness to accurately represent your features.
- Digital Alterations: Photos that have been digitally altered or retouched in any way that changes your appearance are strictly prohibited. This includes removing blemishes, altering facial features, or using filters.
DIY Troubleshooting Checklist: Correcting Common Photo Issues at Home
Before you resubmit your passport photo, take advantage of this practical troubleshooting checklist to self-diagnose and correct any potential issues. These tips are tailored specifically for taking photos at home, helping you avoid common pitfalls:
Lighting
- Optimal Setup: Take your photo in a well-lit room, making sure to use natural light whenever possible. Position yourself near a window but avoid direct sunlight, as this can create harsh, unflattering shadows.
- Fill in Shadows: If shadows are present, use a white reflector (a piece of white foam board works well) or a secondary light source to gently fill in any shadows on your face, ensuring even illumination.
Background
- Ideal Material: Use a plain white sheet or, ideally, a smooth white wall as your background. Ensure the background is free of any patterns, textures, or distracting elements.
- Shadow Prevention: Position yourself a few feet away from the background to prevent casting any shadows on it. This separation is crucial for achieving a clean, uniform background.
Pose and Expression
- Alignment: Face the camera directly with your head level and your eyes wide open. This ensures your facial features are accurately captured.
- Neutrality: Consciously maintain a neutral facial expression. Relax your face, keeping your mouth closed and avoiding any trace of smiling, frowning, or squinting. You can also check our article on Is it okay to smile in a passport photo?.
Attire and Accessories
- Eyewear Removal: Remove eyeglasses completely, unless you possess a signed medical statement from a doctor explicitly stating their necessity. This exception is rare.
- Religious Head Coverings: If you must wear a head covering for religious reasons, make sure it doesn't obscure any part of your face or cast shadows. Ensure the hairline and facial features are fully visible.
- Jewelry Minimization: Keep jewelry to an absolute minimum. Small earrings or necklaces are generally acceptable, but avoid anything large or reflective that could distract from your face.
Image Quality
- High Resolution: Use a high-resolution camera or a smartphone with a good-quality camera. This is vital for capturing a clear and detailed image.
- Focus and Contrast: Ensure the photo is sharply in focus and has proper contrast and brightness. Avoid images that appear blurry, washed out, or overly dark.
- Avoidance of Alterations: Strictly avoid using any digital filters or retouching tools that alter your appearance. The photo must be an accurate representation of your current self.
Understanding Official Requirements: A Concise Guide
To make certain your passport photo will meet all official U.S. requirements, keep the following guidelines firmly in mind:
- Dimensions: The photo must measure exactly 2x2 inches (51x51 mm).
- Head Size: The head size must be between 1 inch and 1 3/8 inches (25 mm to 35 mm) from the bottom of the chin to the top of the head.
- Background: It has to be a plain white or off-white, and completely free of any shadows or distractions.
- Expression: Your facial expression must be neutral, with both eyes open and your mouth closed.
- Attire: Wear normal street attire. Avoid uniforms or clothing that resembles a uniform. Check our article Looking Your Best for Your U.S. Passport Photo What to Wear.
- Head Coverings: These are generally prohibited unless they are worn daily for religious reasons, and even then, they must not obscure your face.
- Eyeglasses: Eyeglasses are not allowed unless a medical exception is documented by a physician.
- Resolution: The photo must have a high resolution of at least 300 DPI.
- File Format: Save your photo in JPEG format.
- File Size: Ensure the digital file size is less than or equal to 240KB.
Step-by-Step Photo Retake Guide: Achieving a Compliant Image
Follow these detailed steps to retake your passport photo and ensure that it meticulously meets all official requirements. This systematic approach will maximize your chances of approval on the first try:
- Set Up Your Environment:
- Find a well-lit room with a plain white or off-white background. The key is to create a clean, distraction-free space.
- Maximize natural light by positioning yourself near a window. Use a white reflector board or a secondary light source to evenly distribute light and eliminate shadows. Avoid harsh direct sunlight.
- Prepare Yourself:
- Dress in your normal, everyday street attire. Avoid wearing any uniforms or clothing that could be mistaken for a uniform.
- Remove eyeglasses unless you have a documented medical exemption. Ensure your face is fully visible.
- Minimize jewelry to reduce potential distractions or reflections.
- If you wear a head covering daily for religious reasons, ensure it's positioned so it doesn't obscure your face, hairline, or cast shadows.
- Position Yourself:
- Stand a few feet (approximately 3-4 feet) away from the prepared background. This helps to avoid shadows.
- Face the camera directly, keeping your head level (not tilted). Look straight into the lens with your eyes open.
- Take the Photo:
- Use a high-resolution camera or a smartphone camera set to its highest resolution setting. Ensure the lens is clean.
- Focus carefully to ensure the photo is sharp and clear.
- Pay attention to contrast and brightness; adjust camera settings as needed to achieve a balanced image.
- Maintain a neutral facial expression. Relax your face, keep your mouth closed, and avoid smiling or frowning.
- Review the Photo:
- Thoroughly check the photo against all the official requirements outlined by the U.S. Department of State.
- Verify that the dimensions (2x2 inches), head size (1-1 3/8 inches), background (plain white), expression (neutral), and attire are all compliant.
- Zoom in to check the photo for sharpness, clarity, and any potential pixelation.
- Edit (If Necessary):
- If the photo requires minor adjustments (e.g., slight cropping to meet size requirements or subtle adjustments to brightness and contrast), use a basic photo editing tool.
- However, strictly avoid using any digital filters or retouching tools that could alter your appearance in any way. The goal is to enhance, not change, your natural look.
Leveraging AI Photo Tools: Ensuring Compliance with Ease
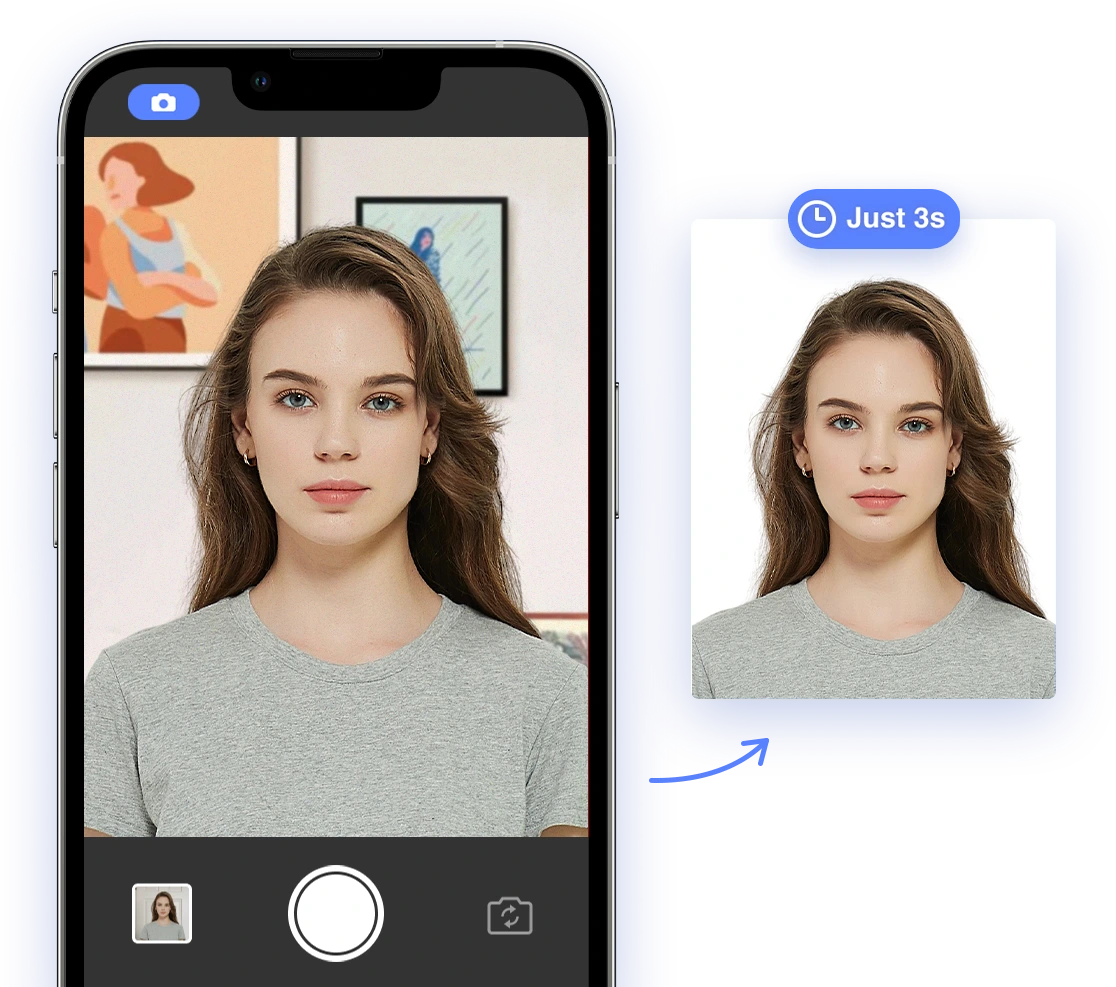
AI-powered passport photo tools can significantly simplify the entire process, as well as minimize the risk of rejection due to non-compliance. AI Passport Photo stands out as a leading solution, offering a comprehensive suite of features specifically designed to ensure your photo meets all stringent requirements:
- Automatic Background Removal: The tool instantly identifies and removes any non-compliant backgrounds, seamlessly replacing them with a plain white background that meets official standards.
- Precise Size Adjustment: It automatically crops and resizes your photo to meet the exact dimensions (2x2 inches) and ensures the head size falls within the specified range, eliminating any guesswork. Check our article on Passport Photo Size in the U.S.
- Comprehensive Quality Checks: The AI analyzes the photo for various quality-related issues, including resolution, brightness, contrast, and color accuracy, ensuring a high-quality image that won't be rejected due to technical flaws.
- Real-Time Compliance Verification: AI Passport Photo continuously verifies your photo against all official requirements in real-time, including facial expression, pose, attire, and the presence of eyeglasses, offering immediate feedback and guidance.
By leveraging the power of AI Passport Photo, you can take a photo conveniently at home using just your smartphone and be supremely confident that it will effortlessly meet all the necessary standards for U.S. passport photos. Our cutting-edge app guarantees that your picture will seamlessly pass the official compliance checks, significantly reducing the chances of rejection.
Use AI Passport Photo to Get Compliant Photos
Professional Photo Services: When and How to Select the Right Option
While taking your passport photo at home offers convenience and control, certain situations may warrant using a professional photo service. Consider this option if you are not comfortable with DIY photography or have unique circumstances that require professional assistance. Here are some options:
- Pharmacies (e.g., CVS, Walgreens): Many pharmacies offer passport photo services, providing trained staff and the necessary equipment to take compliant photos. This can be a convenient option for many.
- Shipping Stores (e.g., FedEx, UPS): Some shipping stores provide passport photo services, offering a quick and reliable solution for obtaining compliant photos.
- Post Offices: Certain post offices that handle passport applications also offer passport photo services as part of their services. You can also check our article on Use a nearby post office to pick up your passport.
- Professional Photo Studios: These studios specialize in portrait photography and can offer high-quality passport photos, along with personalized attention to ensure all requirements are met.
When selecting a professional service, it’s crucial to verify that they are thoroughly familiar with the latest U.S. passport photo requirements and offer a guarantee that your photo will be accepted. Always ask to carefully review the photo before it’s printed or submitted to ensure it meets your satisfaction and adheres to the regulations.
When to Update Your Photo: Recognizing Appearance Changes
It is essential to update your passport photo periodically to reflect any significant changes in your appearance. An outdated photo can cause delays or even prevent you from traveling internationally. Here are some appearance changes that should prompt you to update your passport photo:
- Significant Weight Loss or Gain: A noticeable change in facial structure due to weight fluctuations warrants a new photo.
- Major Hair Color or Style Changes: A dramatically different hair color or a significant change in hairstyle, especially one that obscures the face, requires an updated photo. Check our article on What are the requirements for hair on passport photos in the United States?.
- Facial Surgery or Trauma: Any facial surgery or trauma that alters your recognizable features necessitates a new passport photo.
- Addition or Removal of Prominent Facial Features: The addition of permanent facial tattoos or the removal of prominent facial features (e.g., large moles) requires a new photo.
As a general guideline, it’s prudent to update your passport photo if your current photo no longer accurately reflects your appearance or if you feel you wouldn’t be easily recognized from the existing photo. Updating it avoids any potential hassles during international travel.
Addressing Unique Situations: Children, Infants, and Medical Conditions
Capturing compliant passport photos for children, particularly infants, and for individuals with specific medical conditions can present unique challenges. Here’s some targeted guidance to help navigate these situations successfully:
Children and Infants
- Background Setup: Lay the baby or infant on a plain white or off-white sheet or blanket. This provides a neutral, distraction-free background.
- Shadow Elimination: Ensure that there are no shadows on the baby’s face or across the background. Adjust lighting or reposition the baby to achieve even illumination.
- Assistance Technique: You can hold the baby’s head to keep it steady, but make sure your hands are not visible in the photo. Use a helper to hold the baby if needed.
- Older Children: For older children who can sit or stand independently, follow the same general guidelines as for adults, encouraging them to maintain a neutral expression and look directly at the camera.
Medical Conditions
- Eyeglasses Requirement: If you must wear eyeglasses for documented medical reasons, obtain a signed statement from your doctor explaining the necessity. Submit this statement along with your passport application.
- Head Covering Requirement: If you need to wear a head covering for medical reasons (e.g., to protect sensitive skin), provide documentation from your healthcare provider confirming this necessity.
- Device Positioning: Ensure any required medical devices or accessories do not obscure any part of your face. Work with the positioning of the device to make as much of your face visible as possible.
What To Do If Your Photo Is Rejected Again: Options and Assistance
Even after meticulously following all the guidelines, there's a chance your passport photo could still face rejection. If this happens, don’t be disheartened. Here are several options you can pursue:
- Appeal the Rejection: If you believe your photo meets all requirements but was rejected in error, contact the National Passport Information Center (NPIC) and request a review of your case. Provide any additional documentation or information that supports your claim.
- Seek Further Assistance: Consult with a professional passport service or an experienced immigration attorney for personalized guidance. These professionals can offer expertise in navigating complex cases and advocate on your behalf.
- Resubmit with a Different Photo: If all other avenues fail, consider taking a completely new photo with different settings, utilizing a different background, or trying a professional photo service to ensure compliance.
Staying Up-to-Date: Resources for the Future
Passport photo requirements are subject to change over time as technology evolves and security measures advance. To stay informed and avoid any last-minute surprises, consult these resources regularly:
- U.S. Department of State Website: Regularly visit the official U.S. Department of State website (https://travel.state.gov/) for the latest information on passport photo requirements, application procedures, and any policy updates.
- AI Passport Photo Blog: Subscribe to the AI Passport Photo blog, which is regularly updated with news, tips, and insights related to passport photos and other essential travel documents. The blog is specifically designed to keep you current with all the latest requirements and best practices.
By remaining vigilant, regularly reviewing these resources, and understanding potential issues, you can make sure that your passport photo always meets official requirements. You will also avoid unnecessary delays in your passport application process. Now, you're equipped with all the necessary knowledge and tools to tackle passport photo rejections head-on. You're also ready to ensure a smooth and successful passport application.