Understanding 2026 Passport Photo Requirements
Before you snap that picture, it's crucial to understand the latest regulations set by the U.S. Department of State. Here’s a detailed breakdown:
- Size and Dimensions: Your photo must be 2x2 inches (51x51 mm).
- Head Size: The head size should be between 1 inch and 1 3/8 inches (25-35 mm) from the bottom of your chin to the top of your head.
- Resolution: Aim for a minimum resolution of 300 pixels per inch (PPI).
- Color: Only color photos are accepted; black and white photos are not permissible.
- Background: A plain white or off-white background is mandatory. Make sure there are no shadows or distractions.
- Expression: Maintain a neutral expression with both eyes open and your mouth closed.
- Clothing: Wear your normal, everyday clothing. Uniforms and clothing that resembles a uniform are not allowed.
- Head Coverings: Hats or head coverings are not permitted unless worn daily for religious reasons. In such cases, the full face must be visible, and the head covering must not cast shadows on your face. A signed statement that the head covering is religious attire worn daily in public should be submitted with the application. For medical purposes, a signed doctor's statement is required.
- Eyeglasses: As of November 1, 2016, eyeglasses are generally not allowed. If you must wear eyeglasses for medical reasons, you need to include a signed note from your doctor with your application.
- Quality: Print your photo on matte or glossy photo-quality paper. Avoid creases, smudges, and ink marks. Do not change your photo using computer software, phone apps, filters, or artificial intelligence. The image should be clear, reproduce skin tones accurately, and not be blurry, grainy, or pixelated.
- Recency: Your photo must be taken within the last 6 months to reflect your current appearance.
- Digital Photo (for online renewal, if applicable):
- The digital photo should be at least 600x600 pixels.
- The file format must be a JPEG (.jpg).
- The file size should be between 54 KB and 10 MB.
- General Guidelines: No shadows, no retouching or editing, no selfies, and no filters.
You can find more detailed information on the U.S. Department of State website regarding passport photo requirements.
Setting Up Your Home Photo Studio
Creating a suitable photo environment at home is easier than you think. Here are some practical tips:
- Background: Find a wall or use a clean white sheet/poster board as your background. Ensure it’s evenly lit and free of shadows.
- Lighting: Natural light is best. Position yourself facing a window, but avoid direct sunlight, which can cause harsh shadows. If using artificial light, use two softbox lights placed at 45-degree angles to your face.
- Equipment: A smartphone with a good camera (12MP or higher) is sufficient. Use a tripod to keep the camera steady and ensure consistent framing.
To get a better idea of how to setup your at home studio, check out this video on taking passport photos with your iPhone.
The Power of AI: Ensuring Compliance with AI Passport Photo
AI Passport Photo is your secret weapon for DIY passport photos. This AI-powered tool ensures your photos meet all official requirements automatically. Here’s how to use it:
- Visit the AI Passport Photo Website or App: Access the tool via your web browser or download the app for iOS or Android.
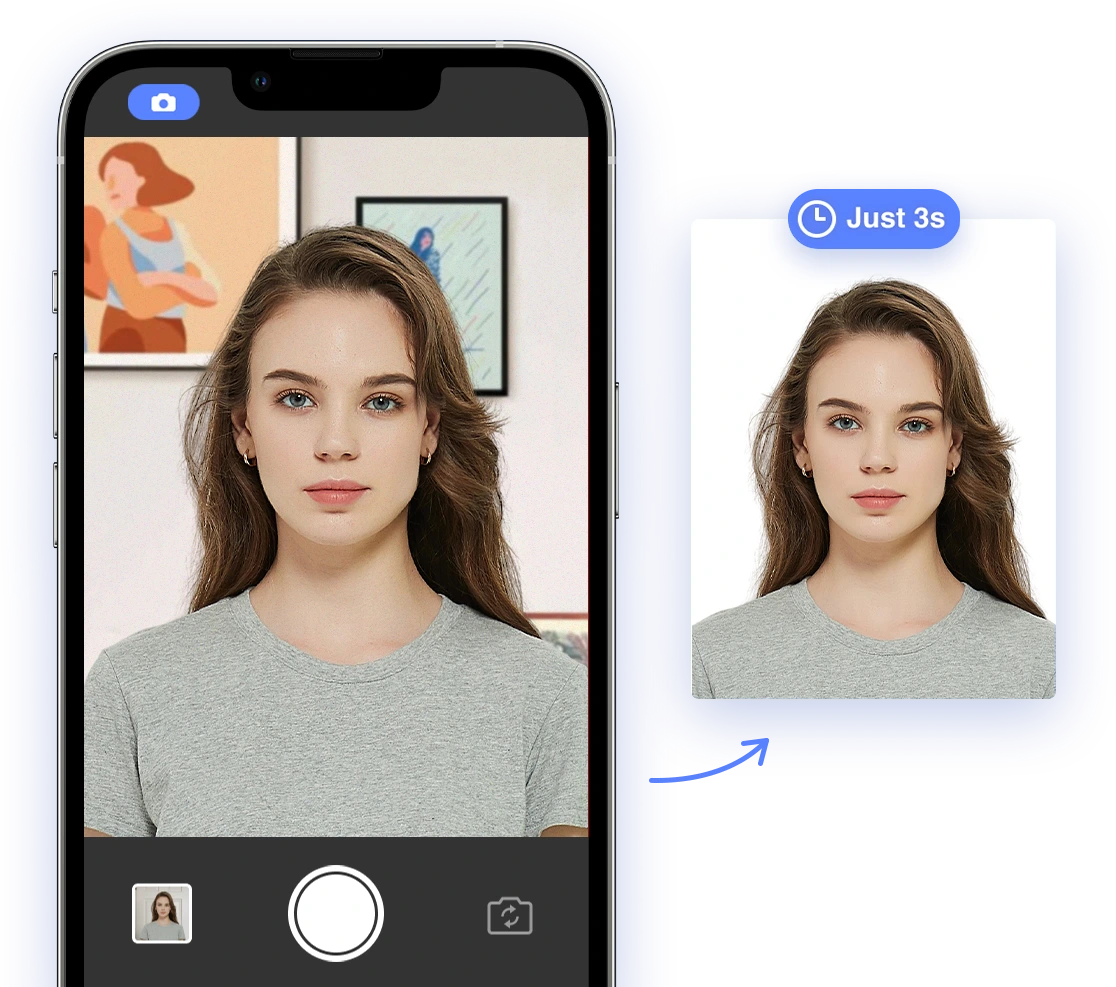
- Upload Your Photo: Choose a photo from your gallery or take a new one directly within the app.
- AI Analysis: The AI will automatically crop, resize, and adjust your photo to meet passport photo specifications.
- Compliance Check: The tool checks for common errors, such as background color, head size, facial expression, and more. For a visual guide on what those common mistakes are, check out this helpful Youtube video.
- Download Your Compliant Photo: Once approved, download the digital photo in the correct size and format.
Consider using digital photo analyzers to ensure compliance with official document requirements. These AI-powered tools can help verify your photos, similar to how AiPassportPhoto works. You can also learn more about common rejection reasons for ID photos to avoid common pitfalls.
Step-by-Step Photo Taking Process
Follow these steps for a successful photo shoot:
- Preparation: Ensure your background is set up correctly, and your lighting is optimal.
- Posing: Stand or sit squarely facing the camera. Keep your shoulders relaxed and avoid tilting your head.
- Attire: Wear everyday clothing. Avoid anything that covers your face or hairline (unless for religious reasons). You can learn more about the appropriate attire for a US passport photo in our detailed guide.
- Expression: Maintain a neutral facial expression. Keep your eyes open and mouth closed.
- Hair and Accessories: Keep hair neat and avoid styles that cover your face. Small jewelry is usually acceptable, but avoid large or distracting pieces. See our guide about what are the requirements for hair on passport photos in the United States?
- Glasses: Remove glasses unless medically required.
- Take Multiple Shots: Take several photos to ensure you have options to choose from. The AI tool will help you select the best one.
Editing and Printing Your AI-Approved Photo
Once AI Passport Photo approves your photo, follow these steps:
- Download the Compliant Digital Photo: Save the digital photo to your device.
- Printing Options:
- Walgreens or CVS: Upload your photo to their online printing service for quick and affordable prints. As of October 7, 2025, a 4x6 print with two passport photos costs $0.39 at Walgreens.
- Online Services: Use online printing services like Amazon Print for home delivery.
- Home Printing: Print at home using photo-quality paper and ensure your printer settings are correct for accurate sizing. For detailed instructions to print photos with your printer, refer to our guide.
- Ensure Correct Sizing: When printing, ensure that the 2x2 inch dimensions are maintained. Check your printer settings to avoid automatic resizing.
Troubleshooting Common Issues and Rejection Reasons
Even with AI assistance, issues can arise. Here's how to troubleshoot:
- Shadows: Adjust your lighting to eliminate shadows on your face or background.
- Poor Lighting: Use additional lighting to brighten your face evenly.
- Incorrect Cropping: Ensure your head size meets the required dimensions.
- AI Rejection: If the AI tool rejects your photo, review the feedback and adjust accordingly. Try different photos until you find one that meets all criteria.
Remember, AI Passport Photo helps identify and correct these issues before you submit your photo, increasing your chances of approval. Plus, check out these tips for taking your passport photo with your iPhone.
Real-World Examples and Success Stories
Many users have successfully created compliant passport photos at home using AI Passport Photo. Here are a few testimonials:
- "I was dreading getting my passport photo, but AI Passport Photo made it so easy! The AI checker caught a shadow I didn't even see, and my photo was approved on the first try."
- "As a student, I'm always looking for ways to save money. This guide and the AI tool saved me a trip to the photo studio and a ton of money!"
Staying Up-to-Date with Future Changes
Passport photo requirements can evolve. Stay informed by:
- Checking the U.S. Department of State Website: Regularly visit the official website for the latest updates.
- Following AI Passport Photo: Keep an eye on the AI Passport Photo blog for updated information and tips. The tool is designed to adapt to future changes automatically, ensuring you're always compliant.
By following this guide and leveraging the power of AI, you can confidently create your own passport photos at home in 2026, saving time, money, and hassle. Good luck, and happy travels!