Why Take Your Passport Photo at Home?
There are several compelling reasons to consider taking your passport photo at home:
- Cost-Effective: Professional passport photos can be expensive. DIY photos save you money. Skip the expensive studio and put those dollars toward your next vacation.
- Convenience: No need to travel to a photo studio; take photos on your own schedule, from the comfort of your living room. Life is busy enough – simplify your to-do list.
- Control: You have complete control over the process, allowing you to ensure you're happy with the final result. Retake as many times as you need until you get a photo you love (within compliance, of course!).
- Comfort: Especially useful for infants and individuals with mobility issues, making the process less stressful for everyone involved. Consider reading our guide on applying for a passport for an adopted child.
Understanding Official U.S. Passport Photo Requirements
Before you start snapping photos, it's crucial to understand the official requirements set by the U.S. Department of State. You can find more information on the official U.S. Department of State website. Here are the key specifications:
- Size: 2x2 inches (51x51 mm). The standard size ensures compatibility with passport systems.
- Color: Must be in color. Black and white photos are not accepted.
- Background: Plain white or off-white. This ensures your face is the focus and there are no distractions.
- Head Size: Head must be between 1 inch and 1 3/8 inches (25 mm - 35 mm) from the bottom of the chin to the top of the head. Accurate head size is critical for biometric identification.
- Resolution: Must be high resolution and not blurry or pixelated. A clear photo allows for accurate facial recognition.
- Expression: Neutral expression, with both eyes open and a clearly visible face. Avoid smiling, frowning, or squinting.
- Attire: Normal everyday attire. No uniforms or clothing that resembles a uniform. No hats or head coverings unless worn daily for religious reasons. Dress comfortably but appropriately. See our passport photo dress code guide for more details.
- Eyeglasses: Not allowed, unless you have a medical condition that requires you to wear them (with a signed statement from your doctor). Contact lenses are generally acceptable. For more information, read about passport photos and medical conditions.
- Lighting: Even lighting, free from shadows or glares. Proper lighting is essential for a clear and accurate photo.
- Recency: Photo must be taken within the last six months. This ensures the photo accurately reflects your current appearance. Read more about why passport photos get rejected.
Step-by-Step Guide to Taking Your Passport Photo at Home
Follow these steps to create a compliant passport photo in the comfort of your home:
1. Preparation
- Choose the Right Location: Select a well-lit room with a plain white or off-white background. A blank wall works best. Avoid busy backgrounds or patterns.
- Gather Your Equipment: You'll need a smartphone or digital camera with a decent resolution, a tripod (optional but recommended for stability), and a friend or family member to assist (if you don't have a tripod).
- Understand the Lighting: Natural light is ideal. Position yourself facing a window, but avoid direct sunlight, which can create harsh shadows. If using artificial light, ensure it's evenly distributed and doesn't cause glare. Softboxes or diffusers can be helpful. If you're not sure about the lighting, it's always a good idea to learn the passport photo advice for men or requirements for hair on passport photos.
2. Setting Up Your Shot
- Position Yourself: Stand or sit about 2-3 feet away from the background. This helps to minimize shadows and ensure the background appears uniform.
- Camera Height: The camera should be at eye level. This provides the most natural and accurate perspective.
- Framing: Frame your face so that your head is centered and the correct size (1-1 3/8 inches). Leave some space above your head, but avoid excessive headroom.
3. Taking the Photo
- Expression: Maintain a neutral expression. Keep your eyes open and look directly at the camera. A slight, natural smile is acceptable, but avoid broad smiles or laughter that can distort your facial features. Unsure if you can smile? Read is it okay to smile in a passport photo.
- Attire: Wear everyday clothing. Avoid white shirts, as they can blend into the background. If you wear head coverings for religious reasons, ensure they don't obscure your face and that your facial features are clearly visible.
- Assistance: Have your friend or family member take the photo, or use a tripod and a self-timer. If using a self-timer, make sure you have enough time to get into position and compose yourself.
- Take Multiple Shots: Take several photos to ensure you have options to choose from. Slight variations in expression or lighting can make a big difference.
4. Editing and Cropping Your Photo
Once you have a few photos to choose from, you'll need to edit and crop them to meet the official requirements. You can use online tools or software to do this, but ensure they don't add any filters or distort your image. Make sure you know the correct passport photo size.
- Crop Tool: Ensure the photo is exactly 2x2 inches (51x51 mm). Use a tool that allows you to specify the exact dimensions in pixels or inches.
- Adjust Head Size: Make sure your head size is within the required range (1-1 3/8 inches). Most online tools will provide guidelines to help you adjust this accurately.
- Background Correction: If your background isn't perfectly white, you can use a background removal tool to make it compliant. Be careful not to create unnatural edges around your head and shoulders. Consider the US passport photo background and it's requirements.
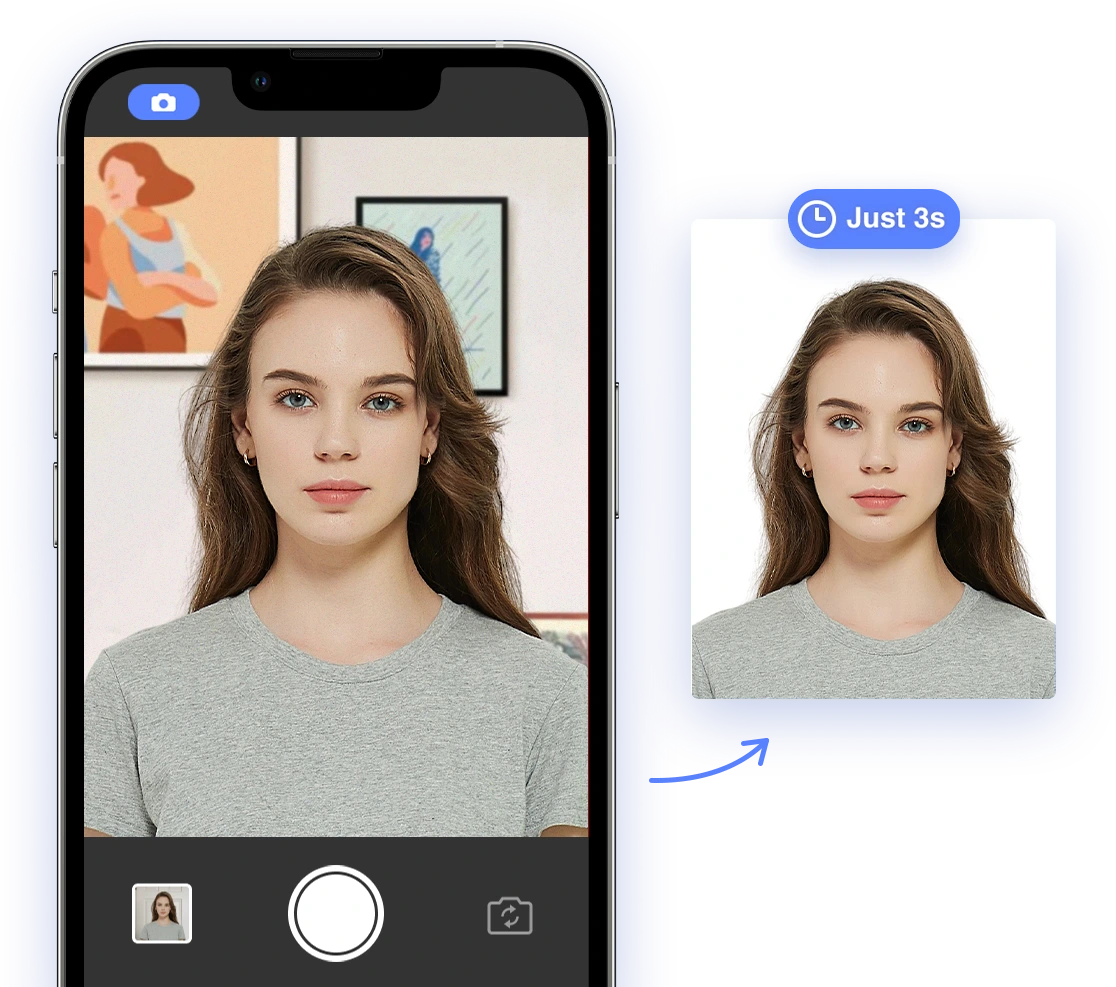
5. Using AI Passport Photo Tools
AI-powered passport photo tools, like AI Passport Photo, can greatly simplify the process and increase the likelihood of acceptance. These tools automatically:
- Check Compliance: Ensure your photo meets all official requirements, including size, resolution, and background.
- Crop and Resize: Automatically crop and resize your photo to the correct dimensions, eliminating manual adjustments.
- Remove Background: Remove and replace non-compliant backgrounds with a perfectly white one.
- Adjust Lighting: Correct lighting issues and eliminate shadows or glare, ensuring even illumination.
Using AI tools can significantly increase your chances of getting an approved passport photo on the first try, saving you time and potential frustration. Read more about how digital photo analyzers are revolutionizing compliance checks.
6. Printing Your Photo
Once your photo is edited and compliant, you'll need to print it. You can print it at home on photo paper or use a printing service like Walgreens or CVS. Remember, the quality of the print can impact acceptance. If you choose this, here are instructions to print photos with your printer.
- Printing at Home: Use high-quality photo paper with a matte or glossy finish (check specific requirements, but glossy is generally preferred) and ensure your printer is set to print at the correct size (2x2 inches). Print a test photo first to check the quality and color accuracy.
- Using a Printing Service: Upload your digital photo to a service like Walgreens 1 hour photo, CVS Photo, or Walmart Photo and order a 4x6 print. Two passport photos will fit on a 4x6 print, making it an affordable option. Select the option for "borderless" printing to ensure the photos are printed at the correct size.
Troubleshooting Common Issues
Even with careful planning, you might encounter some challenges. Here are some common issues and how to address them:
- Shadows and Glare: Adjust your lighting to eliminate shadows and glare. Diffused natural light is best. Try moving to a different location or using a reflector to bounce light.
- Red Eye: Disable the flash on your camera or use a red-eye reduction tool in your editing software. Make sure your subject is looking directly at the camera.
- Blurry Photos: Ensure your camera is stable and your subject is in focus. Use a tripod if necessary and avoid shaking the camera during the shot. Check the photo's resolution to ensure it meets the minimum requirements. If this is the case, you may need to find a place to get passport photos.
- Non-Compliant Background: Use a background removal tool to replace the background with a plain white one. Make sure the edges around your head and shoulders look natural.
- Head Size Issues: Double-check that your head size is within the required range (1-1 3/8 inches). Use an online tool or ruler to measure accurately.
- Expression Problems: Practice maintaining a neutral expression in front of a mirror. Avoid squinting, frowning, or raising your eyebrows.
What to Do If Your DIY Passport Photo Is Rejected
If your passport photo is rejected, don't panic! It happens. Here are the steps to take:
- Review the Rejection Notice: Carefully read the rejection notice to understand why your photo was rejected. The notice will specify the exact issue (e.g., incorrect size, non-compliant background, poor lighting).
- Correct the Issue: Address the specific problem identified in the rejection notice. Use the tips and troubleshooting advice in this guide to take a new photo or edit your existing one.
- Use AI Passport Photo: Before resubmitting, use AI Passport Photo to ensure your photo meets all requirements. This tool can automatically detect and correct common issues, significantly reducing the risk of further rejections. It's a small investment for peace of mind.
- Resubmit Your Application: Follow the instructions provided by the U.S. Department of State to resubmit your passport application with the corrected photo. Make sure you include any requested documentation or forms.
Conclusion
Taking your passport photo at home can be a convenient, cost-effective, and empowering alternative to professional photo services. By carefully understanding the official requirements, following our detailed step-by-step guide, and leveraging AI-powered tools like AI Passport Photo, you can confidently create a compliant photo and avoid unnecessary delays in your passport application process. Embrace the DIY approach and get ready for your next adventure!
Ready to create your perfect passport photo? Try AI Passport Photo today and experience hassle-free compliance! Get started now and take the first step towards your dream vacation.
Image Requirements
- File Format: JPEG
- File Size: Less than 240KB
- Dimensions: 2x2 inches (51x51 mm)
- Resolution: 300 DPI (dots per inch)
Schema Markup Suggestions
{
  "@context": "https://schema.org",
  "@type": "HowTo",
  "name": "Take a Compliant Passport Photo at Home",
  "description": "A step-by-step guide for US citizens to take passport photos at home that meet official requirements.",
  "step": [
    {
      "@type": "HowToStep",
      "position": 1,
      "name": "Preparation",
      "text": "Choose a well-lit room with a plain background and gather your equipment."
    },
    {
      "@type": "HowToStep",
      "position": 2,
      "name": "Setting Up Your Shot",
      "text": "Position yourself 2-3 feet from the background with the camera at eye level."
    },
    {
      "@type": "HowToStep",
      "position": 3,
      "name": "Taking the Photo",
      "text": "Maintain a neutral expression and wear appropriate attire. Take multiple shots."
    },
    {
      "@type": "HowToStep",
      "position": 4,
      "name": "Editing and Cropping",
      "text": "Crop the photo to 2x2 inches and adjust the head size as required."
    },
    {
      "@type": "HowToStep",
      "position": 5,
      "name": "Using AI Tools",
      "text": "Use AI Passport Photo to ensure compliance and correct any issues."
    },
    {
      "@type": "HowToStep",
      "position": 6,
      "name": "Printing the Photo",
      "text": "Print the photo on high-quality photo paper or use a printing service."
    }
  ],
  "supply": [
    {
      "@type": "HowToSupply",
      "name": "Smartphone or Digital Camera"
    },
    {
      "@type": "HowToSupply",
      "name": "Tripod (optional)"
    },
    {
      "@type": "HowToSupply",
      "name": "Plain White Background"
    },
    {
      "@type": "HowToSupply",
      "name": "Photo Editing Software or AI Passport Photo"
    },
    {
      "@type": "HowToSupply",
      "name": "Photo Paper (if printing at home)"
    }
  ]
}
Social Sharing Elements
Include social sharing buttons to encourage readers to share the guide on platforms like Facebook, Twitter, Pinterest, and LinkedIn.
- Shareable Quotes: Highlight key tips and advice as easily shareable quotes within the article.
- Visually Appealing Images: Use high-quality images and graphics to make the article more engaging and shareable.